Minecraft skin guide
How to Turn an Image Into a Minecraft Skin
A practical walkthrough for turning a photo, drawing, or character image into a usable skin—and fixing the parts that do not map cleanly.
A normal picture and a Minecraft skin are both image files, but they do completely different jobs. A photo is viewed as one flat rectangle. A skin is a small texture that Minecraft folds around the head, body, arms, and legs of a 3D character.
That is why changing a picture to 64×64 pixels is not enough. It would only produce a tiny square picture, not a valid skin layout. You need to place the important parts of your image onto the correct body regions, then check how those regions look after they wrap around a model.
Whether you want to convert a photo to a Minecraft skin or work from character artwork, the basic process is the same: position the source, preview the mapped texture, fix important details, and export the PNG. The same steps apply when you make a Minecraft skin from an image such as a drawing, avatar, or game character.
If you already have an image ready, open the Image to Minecraft Skin Converter. The guide below explains what to look for at each step so you do not have to keep starting over.
If you do not have a source image, use the AI Minecraft Skin Generator to create a random 64×64 skin in your browser instead.
What Happens When You Turn an Image Into a Minecraft Skin?
The converter puts a front-facing body guide over your picture. The image visible through the HEAD, BODY, ARM, and LEG boxes becomes the front of those body parts. Colors near the guide are sampled to complete the sides, top, bottom, and back.
The downloaded PNG will look like a collection of disconnected rectangles. That is normal. Each rectangle is one surface of the model—similar to a cardboard box net before it is folded. Minecraft reads their positions and wraps them around the correct cubes.
This also explains an important limitation: one front-facing picture does not contain a real view of the subject's back. A converter can build a coherent back from nearby color and texture, but it cannot recover a hidden logo, hairstyle, or backpack that never appeared in the source.
What Kind of Image Works Best?
Use a clear subject
Pick an image where you can tell what the subject is at thumbnail size. One character against open space works better than a crowded group photo. If you need to crop first, leave enough room around the character for the side and back samples.
Front-facing images work better
The guide is shaped like a character facing you. A person or character facing forward makes it easier to place the head, torso, arms, and legs. A three-quarter pose can work, but one shoulder or leg may contain more detail than the other.
Keep the background simple
Background pixels close to the body guide may be used on the sides and back. A plain wall, sky, or single-color background usually produces cleaner surfaces than text, furniture, or several people behind the subject.
Use strong colors and contrast
Minecraft has very little space for each body part. A dark jacket against a light shirt will survive the conversion better than two nearly identical gray fabrics. Tiny jewelry, thin outlines, and photographic skin texture often disappear.
How to Convert an Image to a Minecraft Skin
Step 1 — Upload your image
Open the converter and choose a PNG, JPG, or WebP file. Your image is processed in the browser; it is not uploaded to BlockSkinLab. If the file is over 10 MB, resize or compress it first.
Step 2 — Position the image over the body
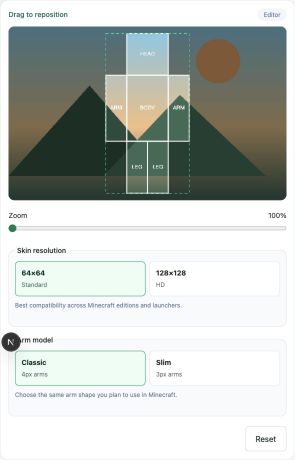
Drag the picture until the subject's head sits inside HEAD, the torso inside BODY, and the limbs line up with the arm and leg boxes. Use Zoom for the final adjustment.
Do not concentrate only on the face. Check the bottom of the guide too. If the image ends at the waist, the legs will have to be filled from whatever background is available.
Step 3 — Choose Classic or Slim arms
Classic uses four-pixel-wide arms; Slim uses three-pixel-wide arms. The guide changes when you switch models, so make this choice before carefully aligning the shoulders. Choose the same model again when you import the skin into Minecraft.
Step 4 — Choose 64×64 or 128×128
Choose 64×64 Standard if you are unsure. It is the normal format and the safest option across editions, launchers, editors, and servers. Choose 128×128 HD only when the Bedrock platform or skin viewer you will use accepts it.
Step 5 — Preview the result in 3D
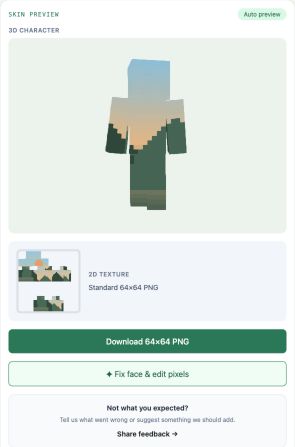
Rotate the model. Look at the front first, then the sides and back. Check for a recognizable face, continuous clothing colors, and arms that meet the shoulders cleanly. The 2D preview is useful for verifying the PNG layout; the 3D preview is the one that shows what players will actually see.
Step 6 — Add missing facial details
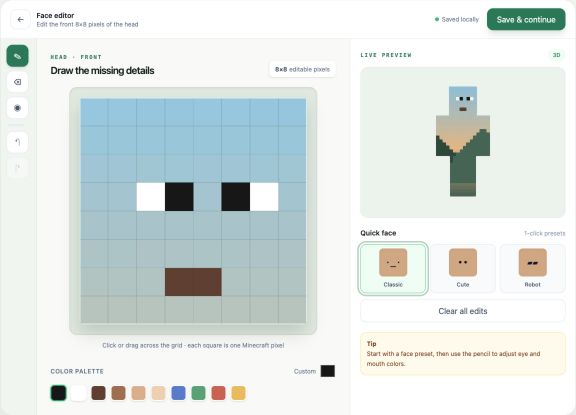
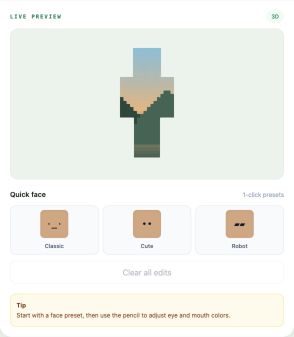
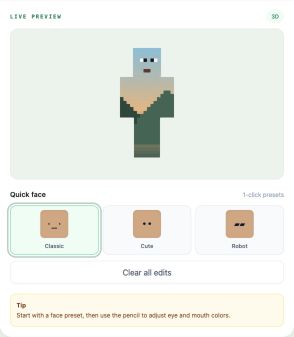
If the character looks faceless, choose Fix face & edit pixels. Start with a Classic, Cute, or Robot preset, or draw your own eyes and mouth on the front 8×8 pixels of the head. Preview the change before keeping it.
Step 7 — Download the PNG
Download the finished skin and keep it as a PNG. Do not crop it, paste it into another document, or change its dimensions afterward. When you are ready to use it, follow the custom skin upload guide.
Why Does My Converted Skin Have No Eyes or Mouth?
An image converter preserves image content; it does not automatically redesign every subject as a traditional Minecraft character. A face that looked obvious in a large photo may become only a few similar-colored pixels when squeezed into the head's 8×8 front surface.
Placement matters too. If the real eyes sit near the top edge of the HEAD guide, they may land on the top surface rather than the front. If the source is a landscape, logo, texture, or object, there may be no facial pixels to map at all.
This is a conversion issue, not a broken download. Open the face editor and deliberately add the two or three features the character needs. The detailed eyes and face guide shows reliable pixel placements.
How to Make the Face Look More Like a Minecraft Character
Start small. Two high-contrast eyes are usually enough to establish the front of the head. Add a one- or two-pixel mouth only if it improves the expression.
- Try a preset first when you want a quick, readable face.
- Use the color picker to borrow a dark tone already present in the skin.
- Keep the eyes aligned unless asymmetry is intentional.
- Rotate the 3D preview after every few edits.
- Use undo instead of clearing everything when one pixel feels wrong.
The editor changes only the head's front 8×8 area. It will not repaint the sides of the face, hair, torso, or clothing. For a precise explanation of where those areas live, see the Minecraft skin template guide.
64×64 or 128×128?
Use 64×64 for modern Java Edition custom skins and whenever you want the widest compatibility. It has enough resolution for the classic Minecraft look and avoids most import problems.
Use 128×128 only for a confirmed HD workflow, usually on a Bedrock platform or third-party viewer that explicitly accepts it. More pixels can preserve finer source detail, but they do not improve a weak crop or add a missing face. Read the full 64×64 versus 128×128 comparison before choosing HD.
Common Image-to-Skin Problems
The face is in the wrong position
Go back to positioning and move the image, rather than trying to redraw the entire face. The eyes and mouth need to sit in the HEAD box—not above it.
The image is too detailed
Zoom in on one character or choose a simpler source. A skin cannot preserve every strand of hair, fabric pattern, or line of text.
The front and back are hard to distinguish
Use a source with useful colors around both sides of the guide. If the result still feels flat, add a simple feature to the face so the front is immediately clear.
The arms look cut or uneven
Check whether you positioned the image using one arm model and imported it using the other. Re-export or select the matching Classic/Slim option in Minecraft.
Everything looks muddy
Try a brighter, higher-contrast image. Raising the source contrast before conversion often helps more than editing dozens of individual skin pixels afterward.
FAQ
How do I turn an image into a Minecraft skin?
Upload a PNG, JPEG, or WebP to the image-to-skin converter, position the subject inside the body guide, choose Classic or Slim arms and a 64×64 or 128×128 output, preview the result in 3D, fix the face if needed, and download the skin PNG.
Can I turn a picture of myself into a Minecraft skin?
Yes. A clear, front-facing picture with the face and clothing visible is the easiest starting point. Position your face inside the head guide and check the 3D preview before downloading.
Why does my converted Minecraft skin have no eyes?
The source eyes may have missed the front head area or become too small when mapped to an 8×8 face. Reposition the image or use the face editor to add a simple pair of high-contrast eyes.
Should I download a 64×64 or 128×128 Minecraft skin?
Choose 64×64 for standard Java Edition and the widest compatibility. Choose 128×128 only when the exact Bedrock device, viewer, client, or server you use accepts HD custom skins.