
Minecraft skin guide
How to Make Eyes on a Minecraft Skin
Place two readable eyes on the front 8×8 head grid, then preview the skin so they do not end up too high, too close, or on the wrong side.
If your skin looks fine in 2D but turns into a blank-headed character in 3D, the file may not be broken. The face is simply a very small part of the texture: just 8×8 pixels on a standard skin. A pair of eyes that misses that area by one block can end up on the top or side of the head.
The quickest fix is to edit the head front, not to repaint the full skin. If you made the skin with BlockSkinLab, open the image converter, create the skin, and choose Fix face & edit pixels.
Where Is the Face on a Minecraft Skin?
The face belongs on the front surface of the base head. In a modern 64×64 skin texture, that surface occupies an 8×8 square. The head also has separate rectangles for the back, left, right, top, and bottom.
This is easy to misread in the flat PNG because the six surfaces sit next to one another like an unfolded box. Drawing eyes on the nearest head-colored square is a gamble. Use a skin-aware editor or check the exact area in the Minecraft skin template guide.
There is also an outer head layer, often called the hat layer. It can hold hair, hats, glasses, or other details above the base head. For a simple face repair, edit the base head front first. An opaque outer layer can cover work underneath it.
How Many Pixels Is a Minecraft Face?
The face is 8×8 pixels on a 64×64 skin. That gives you 64 cells, but hair, skin, a mask, and shadows all compete for the same space. You do not need to fill most of them.
Think of the grid as a set of landmarks:
- The top one or two rows often read as hair or forehead.
- The middle rows are the safest place for eyes.
- The lower rows can hold a small mouth, beard, mask, or chin shadow.
- The left and right edge pixels wrap close to the head sides, so central features are easier to read.
On a 128×128 texture, the same face region is 16×16 texture pixels. The model proportions do not change; the texture simply has twice as many pixels in each direction.
How to Make Eyes on a Minecraft Skin
Start with two single pixels. Place them on the same row around the upper-middle of the face, then leave one or two cells between them. This basic arrangement survives distance, movement, and dark in-game lighting better than a detailed eye with several nearly identical colors.
Choose a color that separates from the surrounding skin or hair. Dark brown, charcoal, or deep navy often looks less harsh than pure black while still providing contrast. For glowing, robot, or fantasy eyes, use a bright color with a darker neighboring pixel to keep the shape readable.
Symmetry is a safe starting point, not a rule. A scar, wink, visor, or asymmetrical hairstyle may need different eyes. Make the normal version first, check it in 3D, and then change one side deliberately.
A reliable starting pattern
- Leave at least one row above the eyes for the hairline or forehead.
- Put both eyes on the same row.
- Leave one or two pixels between them.
- Preview from normal gameplay distance.
- Add a second eye color only if the single-pixel version feels too plain.
If your image-converted skin already contains faint eyes, use them as a placement guide. Strengthen one or two pixels rather than covering the whole face with a preset.
How to Add a Mouth
A mouth can be one centered pixel, a two-pixel horizontal line, or a small offset shape. Bigger is not automatically more expressive. On an 8×8 face, a four-pixel line can dominate the whole character.
For a neutral face, try one or two dark pixels one or two rows below the eyes. For a smile, place two pixels on one row and a slightly darker pixel below or beside them. A character with a beard, mask, animal muzzle, or very low eyes may not need a separate mouth.
Check contrast again. A pure red mouth can look like a bright stripe on a pale face; a darker version of the skin tone often feels more natural.
Use a Face Preset for a Quick Result
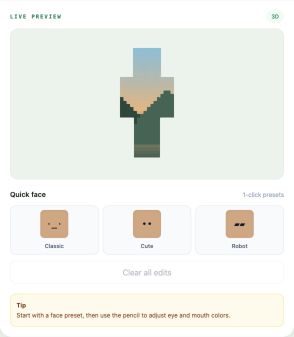
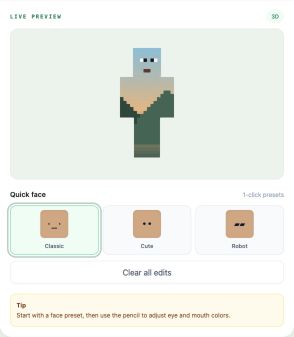
BlockSkinLab includes Classic, Cute, and Robot presets. They are useful when a converted landscape, texture, object, or photo has no readable face at all.
Apply the closest preset, then adjust it. Presets replace one another instead of stacking, so you can compare all three safely. The preset is a starting point—not a requirement to accept every pixel it adds.
- Classic works for a simple humanoid character.
- Cute emphasizes small, readable eyes.
- Robot gives you a mechanical face that suits armor, machines, and abstract source images.
How to Edit the Face Pixel by Pixel
Choose Fix face & edit pixels after converting an image. The editor isolates the head front so you cannot accidentally draw on the torso or back of the head.
Use Pencil to add color, Pick color to reuse a color already in the face, and Restore original pixel when you want to remove one edit without erasing the converted image underneath. Undo and redo are useful for comparing two placements. Clear all edits removes the face changes and returns to the converted version.
Work in short passes:
- Add the eyes.
- Check the 3D preview.
- Add a mouth only if the face still needs one.
- Rotate the model slightly left and right.
- Download only after the face reads clearly at the preview's normal size.
Preview the Face in 3D
The flat grid is best for accurate pixel placement. The 3D preview is best for judgment. A centered face in the grid can still feel too high once hair wraps over the top, and a mouth can look wider when seen beside the head edges.
Look at the skin from the front, then turn it about 30 degrees in each direction. If an eye seems to slide around the corner, it is probably too close to the edge. If the character looks surprised from every angle, the eyes may be too high or too close together.
How to Fix a Face on a Skin Made From an Image
First decide whether the issue is placement or missing pixels. If the source face landed above, below, or outside the head, go back and reposition the entire image. Pixel editing cannot rescue a crop where the clothing and limbs are also misaligned.
If the body looks good and only the face is vague, keep the conversion. Open the 8×8 editor and strengthen the eyes, then add a mouth if needed. This preserves the source colors while giving the character a clear front.
For the whole workflow—from selecting a source through downloading—use the image-to-skin step-by-step guide.
Common Minecraft Face Mistakes
Eyes too high
They can read as a hair ornament or disappear near the top edge. Move them down one row and check again.
Eyes too close together
Two adjacent dark pixels often merge into a visor or nose. Leave a gap unless that is the intended style.
Mouth too large
Remove pixels before adding shading. A small, clear shape usually works better than a detailed mouth squeezed into the grid.
Low contrast
Choose a lighter or darker version of the same hue. You do not have to switch to pure black.
Drawing on the wrong side of the head
Use a skin-aware face editor and rotate the preview. If your changes appear on the back or side, move them to the head-front region rather than copying them across every surface.
FAQ
How do you make eyes on a Minecraft skin?
Edit the front 8×8 area of the base head. Start with one pixel for each eye, place both pixels on the same row around the upper-middle of the face, and leave one or two pixels between them. Then rotate a 3D preview to confirm that the eyes sit on the front.
Where should eyes be placed on a Minecraft skin?
On a standard 64×64 skin, place the eyes on the front 8×8 area of the head. A reliable starting point is the upper-middle of the face, with both eyes on the same row and one or two blank pixels between them. Adjust the position if the hairline or character design needs different proportions.
How many pixels wide should Minecraft skin eyes be?
There is no single required width. Start with one pixel per eye for a simple, readable Minecraft-style face. Two-pixel eyes can work when the character needs more detail, but larger shapes can quickly take over the limited 8×8 face area.
Why does my Minecraft skin face look backwards?
The facial pixels may be on the back or side of the head instead of the head-front region. Edit the front 8×8 face area and rotate the 3D preview to confirm that the eyes and mouth appear on the front before downloading.