Minecraft skin guide
How to Edit an Existing Minecraft Skin in 3D
Open an existing 64×64 skin, recolor clothes and details directly on the 3D character, check every side, and export a separate edited PNG.
If you already have a Minecraft skin PNG, you do not need to rebuild it from scratch just to change a shirt, hair color, shoes, or a few face pixels. Open the file in a skin-aware editor, work on the assembled character, and save the result as another PNG.
The BlockSkinLab Minecraft Skin Editor lets you paint directly on a rotatable 3D model. It is free, requires no account, and keeps the skin pixels in your browser. This guide follows the controls that are available in the editor now.
If you are still choosing a tool, the free Minecraft skin editor comparison separates quick browser editing from advanced modeling, texture-layer, and community-library workflows.
What You Need Before Editing
Use a real 64×64 Minecraft skin PNG. A normal portrait saved as PNG is still a picture, not a skin texture, because its pixels are not arranged into Minecraft's head, torso, arm, leg, and layer regions.
Before opening the editor, check these details:
- The file is a PNG and no larger than 10 MB.
- Its dimensions are exactly 64×64 pixels.
- It uses the modern square skin layout.
- You know whether its arms are Classic 4px or Slim 3px.
If your file is 128×128 or 64×32, read the Minecraft skin size guide before editing. Resizing a different layout to 64×64 does not automatically turn it into a valid modern skin.
How to Edit a Minecraft Skin Online
Step 1 — Open the editor and upload the PNG
Open the 3D skin editor, choose Upload skin, and select the file from your device. The source label above the canvas changes to the uploaded filename when it opens successfully.
If the editor rejects the file, check its format, dimensions, and size. The editor accepts a modern 64×64 PNG; it does not silently convert HD or legacy layouts.
Step 2 — Match Classic or Slim arms
Choose Classic 4px for wide or Steve-style arms and Slim 3px for Alex-style arms. Look at both shoulders and the outer edge of each arm. Missing strips or odd seams usually mean the model does not match the texture.
This control changes the 3D model used to interpret the arm regions. It does not convert the pixels. Select the correct model before doing detailed sleeve work.
Step 3 — Pick the editing tool
The four tools have different jobs:
- Pencil paints one selected square with the current color.
- Pick color samples an existing pixel, then returns to Pencil for an opaque color.
- Fill connected area replaces one connected patch of matching color on the clicked face.
- Transparent eraser clears a pixel so it becomes transparent.
Use the color palette for quick choices or the custom color input when you need a specific hex color. To preserve the visual language of an existing skin, sample one of its colors first and adjust from there.
Step 4 — Click to edit, drag to rotate
Release the mouse after rotating the model, then click the visible square you want to change. Dragging rotates the view instead of painting a continuous stroke. Scroll or pinch to zoom.
When zoomed in, use Shift-drag, right-drag, or the arrow buttons above the canvas to move the view. Reset view restores the camera without changing the texture.
Step 5 — Reach hidden surfaces
Turn on Spread limbs to separate the arms and legs. Rotate the model to reach inner sleeves, inner legs, the back, and narrow side surfaces. Look from above or below to edit the top of the head, shoulders, and soles.
Use Undo after a mistaken click and Redo if you change your mind. Turning off Pixel grid gives you a cleaner preview without changing the downloaded texture.
Step 6 — Download the edited file
Choose Download PNG when every side is ready. The download is the 64×64 skin texture, not a screenshot of the 3D character. Your original local file remains unchanged.
How to Recolor Minecraft Skin Clothes
Start by identifying the clothing's main color, shadows, highlights, and separate pieces. A shirt that appears to be one object on the character may be split across the torso, arms, side strips, and back.
For a flat-color shirt:
- Choose Pick color and sample the main shirt color.
- Select the replacement color.
- Use Fill connected area on the torso front.
- Rotate and fill the torso sides and back separately.
- Edit each sleeve surface on the arms.
- Paint shadows and highlights with Pencil if you want to keep depth.
Fill does not understand the meaning of “shirt.” It follows connected pixels of the same color inside the clicked face. A darker shadow, logo, seam, arm, or adjacent surface is a different area. That limited behavior is useful because it prevents one click from unexpectedly recoloring unrelated parts of the texture.
For patterned clothing, work with Pencil and reuse sampled colors. Zoom in, change a small group, rotate the model, and check how the design crosses each edge before continuing.
Keep the main color dominant, then restore a smaller shadow and highlight instead of replacing the whole garment with one flat tone. The skin shading guide provides a four-color ramp and a consistent light direction for that finishing pass.
Real example: recoloring a shirt in the 3D editor
We opened the same 64×64 skin used in the screenshots below, selected Fill connected area, and changed the connected front torso panel from gray to blue. This is a real BlockSkinLab editing session, not a mockup. Only the visible connected panel changed, which is why the sleeves, shadows, back, and separate color islands still need their own pass.
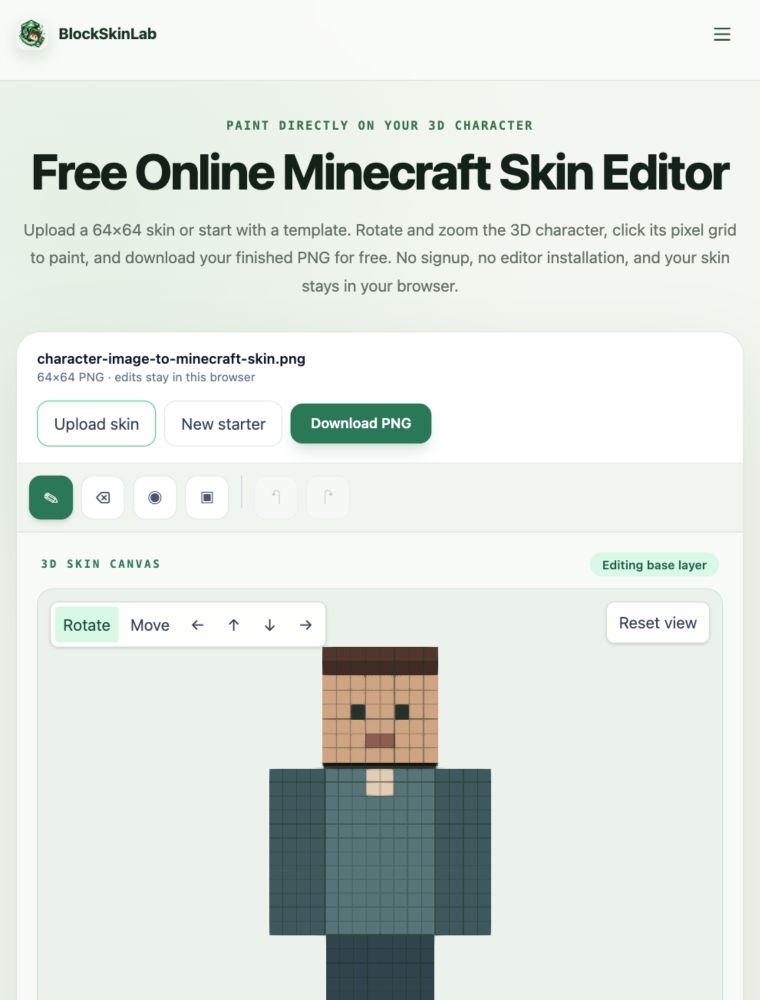
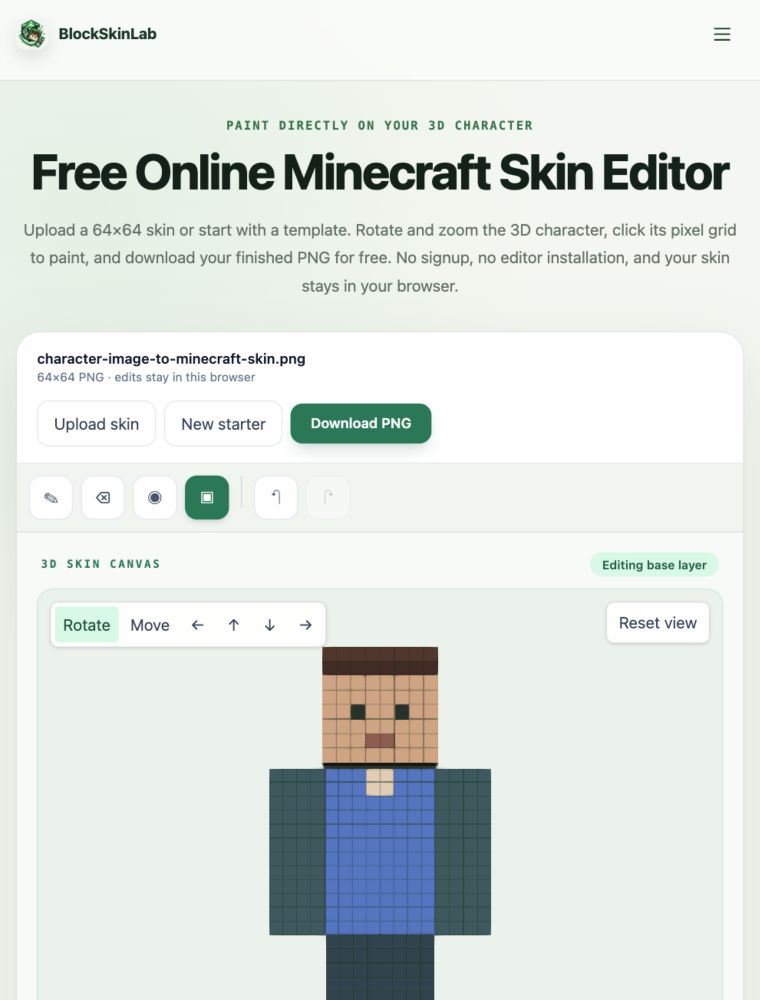
The exported result is a real standard skin texture. You can download the edited 64×64 PNG to inspect the flat file that the editor produced.

How to Edit the Back and Sides
A skin can look finished from the front while still having mismatched sleeves, a blank back, or a bright stripe under an arm. Check the model in a consistent order:
- Front of the head, torso, arms, and legs.
- Character's right side.
- Back of the head, jacket, trousers, and shoes.
- Character's left side.
- Inner arms and legs with Spread limbs enabled.
- Top and bottom surfaces.
Pay special attention to seams where the torso meets the arms and where trouser legs meet the body. Continue the same color or pattern across both surfaces when the design should look connected.
If hair, a jacket, hat, cuff, or other raised detail sits above the base, switch to Outer. The separate outer-layer editing guide explains how transparency and layer visibility work.
Common Minecraft Skin Editing Mistakes
Editing the wrong layer
If a color appears to float above the body or disappears when the outer layer is hidden, it was painted on Outer. Choose Base for the essential body and clothing, and Outer for raised finishing details.
Expecting Fill to replace every similar color
Fill is local to one connected patch on one face. Repeat it on separate surfaces and color islands. If the garment uses several shades, replace each shade deliberately instead of flattening the entire design into one color.
Using Transparent eraser on the base by accident
Erasing an outer pixel reveals the base underneath. Erasing a base pixel creates a transparent hole in that part of the texture. If the result is accidental, use Undo or Reset entire skin.
Switching the arm model after editing
Classic and Slim use different arm widths. Switching the preview does not remap your edits. Confirm the model first, then paint the arms and keep the same selection when importing the PNG into Minecraft.
Leaving without downloading
The current session is not a saved cloud project. Download an edited copy whenever you reach a version you want to keep.
Download and Use Your Edited Skin
Keep the downloaded PNG at 64×64. Do not crop it, enlarge it with a photo editor, or convert it to JPG. Follow the Java and Bedrock skin upload guide and choose the same Classic or Slim model.
Java Edition can use the file through the official Launcher or minecraft.net profile. Supported Bedrock devices can import it through Dressing Room and Classic Skins. Some consoles do not offer local PNG import.
FAQ
Where can I edit an existing Minecraft skin online?
Open the free BlockSkinLab Minecraft Skin Editor, choose Upload skin, and select a modern 64×64 Minecraft skin PNG. You can paint on the rotatable 3D character, edit the base and outer layers, and download a separate PNG without creating an account.
How do I change the clothes or colors on my Minecraft skin?
Use Pick color to sample an existing shade, Pencil to replace individual pixels, or Fill connected area to recolor one connected patch on the visible face. Rotate the model and repeat the edit on the sides, back, and other body parts that belong to the clothing.
Does Fill recolor the whole shirt at once?
No. Fill changes a connected area of the same color inside the clicked 3D face. Seams, separate body parts, shadows, highlights, and different colors divide the clothing into separate areas, so you may need to fill or paint each area individually.
Can I paint while dragging the Minecraft skin?
Dragging turns the camera in the current 3D editor. Rotate to the surface you want, release, and click a visible pixel to edit it. This prevents a camera movement from drawing an accidental line across the skin.
Can I undo a Minecraft skin edit?
Yes. Undo reverses recent pixel changes and Redo reapplies them. Reset entire skin restores the file or starter that was opened for the current session, but refreshing or closing the page discards the session.
Does changing Classic to Slim convert my skin?
No. The switch changes how the same texture is previewed; it does not rearrange or redraw arm pixels. Choose the model the PNG was designed for before editing the arms.
What file formats can the Minecraft Skin Editor open?
This version opens PNG files with the modern 64×64 Minecraft skin layout, up to 10 MB. It does not import 128×128 HD skins or legacy 64×32 files.
Will editing overwrite my original skin file?
No. Browser editing does not modify the source file on your device. Download PNG creates an edited copy with an -edited filename. Keep that download before refreshing, closing the page, uploading another skin, or loading the starter.